The Adventures of Lolo - Guide / Walkthrough
Room 1
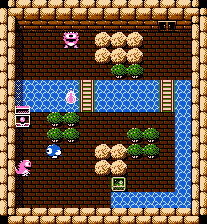
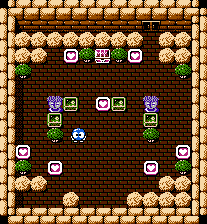
Snakey is a friendly harmless monster. If you need to move him out of the way, you will need to use the Magic shot to turn him into an egg first.
Grab the first Heart Framer and you will get a Magic Shot for Lolo. You can use this to turn enemies into an egg that he can push around. Use it on the Snakey and push him out of the way so you can grab the last Heart Framer. Now the chest will open so you can grab the Jewel and move on to the next room.
Room 2
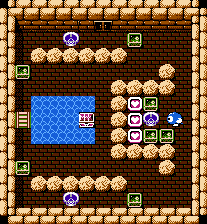
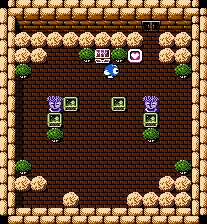
Gol is harmless until Lolo picks up all the Heart Framers in the room. He will then come alive and shoot a fireball if you cross into his view. If you are far enough away you can run past them before they can hit Lolo.
In this room, you will see some Gols. They will come alive when all of the Heart Framers are gathered and shoot a fireball at Lolo. The fireball can be dodged in time though if Lolo is far enough away. Make sure you don't grab the Heart Framer in the upper left side of the room first or you won't be able to get past the Gol there. You will also find an Emerald Framer in this room which Lolo can push around. These are handy for blocking an enemy's shot or path.
Room 3

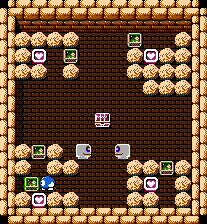
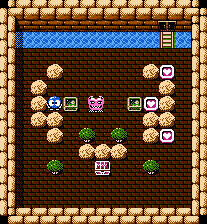
Leepers are harmless but they will fall asleep if they touch Lolo. They can easily block narrow paths so it's best to draw them into a more open area to let them fall asleep.
Pick up the Heart Framer to get a Magic Shot. If you use a Magic shot to turn an enemy into an egg, you can use another shot to send it flying right out of the room! Doing that, you can get past the Snakey blocking your way. There is a Leeper patrolling the room and it will fall asleep if it touches you. This can easily block Lolo's path, forcing you to restart the room. Let him run into Lolo in the open area so he won't be able to block the way to the remaining Heart Framers.
Room 4
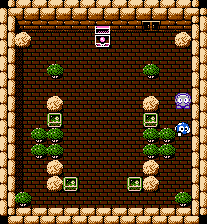
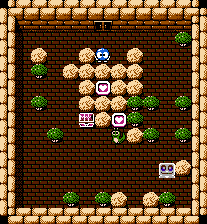
Skulls remain lifeless until Lolo collects all of the Heart Framers. They will then start patrolling the room looking for intruders.
The Skulls in this room will come alive once you grab all of the Heart Framers. You can block the Skulls on the top and bottom of the room by having Lolo push the Emerald Framer Boxes. You can push the Emerald Framers out of the way on the right side of the room but the Skull will still block your way. The Heart Framers on the left side will give Lolo 2 magic shots to get rid of the Skull and safely grab the Jewel.
Room 5
Though they won't harm Lolo if touched, they will charge if they see him and can trap him in a corner.
The Rockys in this room will sometimes charge Lolo and can block him in a small area, forcing you to restart the room. It is best to keep on the move, pushing the Emerald Framers out of the way to grab the Heart Framers. If you make your way clockwise around the room starting with the Heart Framer to the lower left, you should be able to grab them all before the Rockys even have a chance to charge you!
Floor 2
Room 6

The Alma will start chasing Lolo right away. When it gets close, it will sometimes roll at Lolo and won't be able to change directions momentarily.
This room is challenging because the Alma will start chasing Lolo from his very first step. Keep Lolo on the move collecting Heart Framers around the room and grab the Jewel before the Alma can catch up.
Room 7
The Medusa can't move but it will launch deadly spikes at Lolo if he crosses into their view in any 4 direction. Their shots won't be able to go through Emerald Framers, Heart Framers, stones or even other monsters! They can shoot through bushes though so use the Emerald Framers in this room to your advantage.There are 2 Medusas in this room who are immobile but will shoot unavoidable deadly spikes at Lolo if he crosses their line of fire in any 4 direction. The spikes can shoot through the bushes but not through Emerald Framers. Have Lolo push them so their attacks are blocked to the bottom and the center. Now Lolo can pick up the rest of the Heart Framers without having to cross into their attack area!
Room 8

The Don Medusa is more dangerous than the Medusa because it can move back and forth. It still has the same attack abilities as the Medusa so use those Emerald Framers!
The Don Medusa in this room will attack just like the Medusas in the last room except he is able to move back and forth. Lolo can push the Emerald framers up to block his shot to make the Heart Framers in the middle of the room safe to grab. Just don't get impatient and try to walk across the top of the room!
Room 9
Collect all the Heart Framers in reach and Lolo will get a Hammer to use which can be used to destroy one stone. Use it on the stone at the top of the room to collect the Heart Framer and get a Magic Shot along with it. Use the Magic Shot to shoot away the Snakey blocking the way to the final Heart Framer.
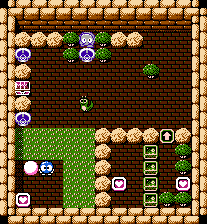
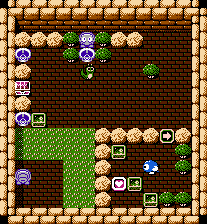
Room 10
Collect the two Heart Framers to get a Magic Shot. You can use one shot to turn the Alma into an egg to make it easy to grab the Heart Framer at the bottom of the room. You will get a Direction Change item which will allow you to pass through the arrow tile on the right side of the room. Use the remaining shot to push the Snakey up against the Skull and Alma to block them in. You can push the top and third Emerald Framers to the left, allowing you to move one Emerald Framer out to block one of the Skulls to make the dash to the Jewel easier after you grab the final Heart framer.